How to Build an Epic Medieval Windmill in Minecraft: Aesthetic & Auto-Farm Guide
A comprehensive guide on building a medieval windmill in Minecraft, combining aesthetic architecture with functional auto-farm interiors.
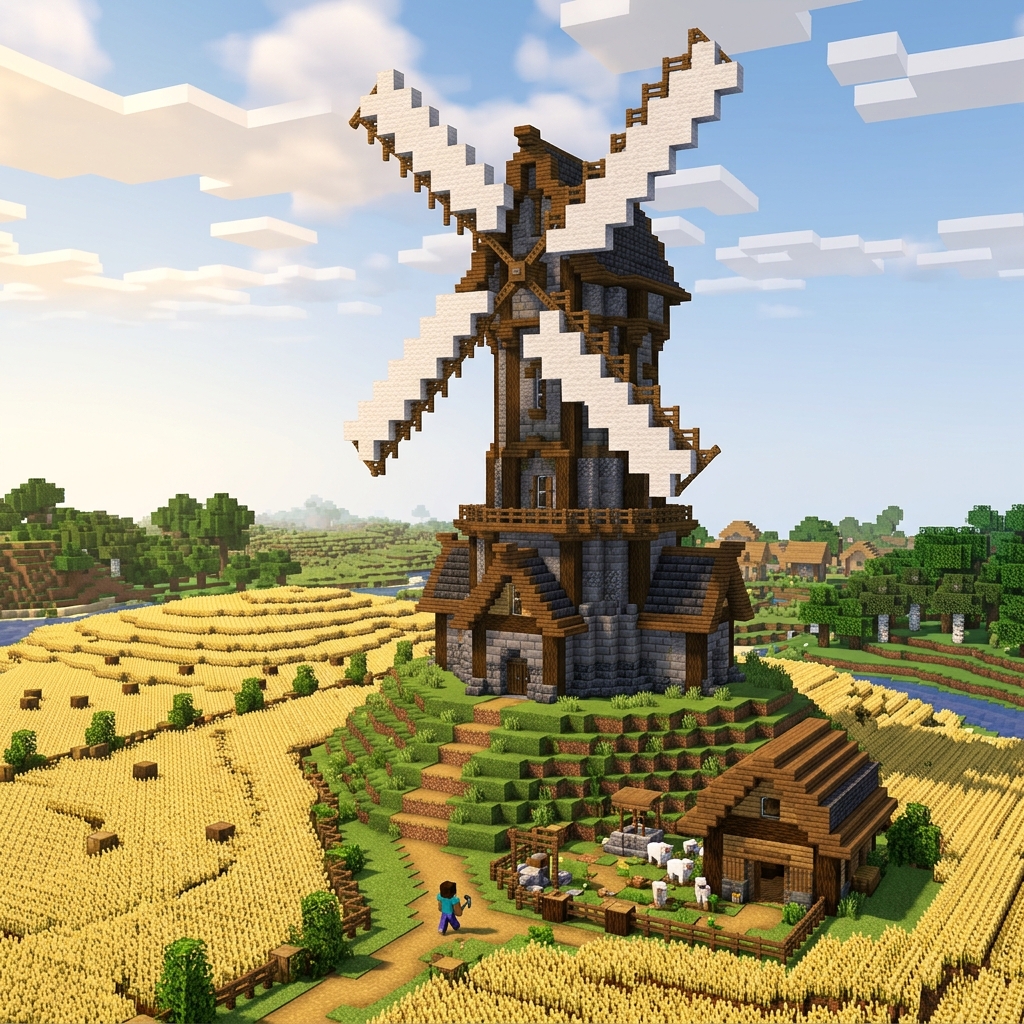
How to Build an Epic Medieval Windmill in Minecraft: Aesthetic & Auto-Farm Guide
There is something undeniably charming about a Medieval-style Minecraft base. The mix of stone, dark woods, and rustic aesthetics creates a cozy, lived-in feel that modern builds often lack. But if your medieval village is just a collection of houses and a blacksmith, it’s missing a crucial centerpiece: a towering, fully detailed Medieval Windmill.
Not only does a windmill serve as a fantastic landmark to guide you home, but it also provides the perfect thematic shell to house your automated wheat farms, mass storage systems, and auto-harvest redstone. A massive exterior shell without a functional core is a missed opportunity.
Whether you are a builder who cares about block palettes or a technical player looking to hide your hopper minecarts and redstone comparators, this guide covers both the aesthetic architecture and the redstone-ready interior.
Quick Specs:
- Footprint: 7x7 foundation
- Height: ~20-25 blocks tall
- Sails: 15x15 spread
- Difficulty: Intermediate
- Ideal Biomes: Plains, Taiga, Savanna
- Version: Java & Bedrock
Table of Contents
- Where to Place Your Windmill
- Understanding Windmill Types
- Materials List
- Step 1: Laying the Foundation
- Step 2: Constructing the Tower Body
- Step 3: Crafting the Rustic Roof
- Step 4: Windmill Sails
- Step 5: Detailing — Windows, Vines, Yard, Lighting
- Step 6: Functional Interior (Millstone, Storage, Auto-Farm)
- Java vs. Bedrock Differences
- Common Mistakes to Avoid
- FAQ
- Final Thoughts
1. Where to Place Your Windmill
Context is everything. A windmill looks out of place at the bottom of a ravine. You want to place your foundation on an elevated hill within a Plains village, Taiga, or Savanna biome to simulate catching the wind.
If you’re building near a Pillager outpost, be careful—you don’t want patrol spawns wandering into your auto-farms. Conversely, repurposing a cleared-out outpost tower into a windmill is an amazing survival project. Ensure there is a clear sightline from your main base, and connect it to your village with a well-trodden dirt path. If you are building right on the edge of a river instead of a hill, you might want to pivot this build into a watermill by swapping the sails for a water wheel!
2. Understanding Windmill Types
Before building, it helps to know the terminology. This guide builds a Tower mill (a stone and brick structure where only the roof cap turns). However, you can easily adapt this guide to other historical styles:
- Smock mill: Sloping wooden sides, usually octagonal.
- Post mill: The entire body of the mill balances and rotates on a central wooden peg.
- Dutch windmill: The classic, massive brick towers with four distinct rectangular sails.
3. Materials List (7x7 Footprint, ~20 Blocks Tall)
Gather your supplies. This build relies on the contrast between sturdy stone and dark woods, plus plenty of redstone components for the interior.
Aesthetic Blocks:
- Stone Brick variants, Cobblestone & Andesite: ~3 Stacks total
- Spruce Logs, Planks & Slabs: ~5 Stacks total
- Stripped Spruce or Dark Oak Logs: ~1 Stack
- White Wool or White Concrete: ~2 Stacks (For the canvas sails)
- Deepslate Tile/Bricks: ~1.5 Stacks (For the steep roofing)
Functional Interior & Redstone:
- Hoppers, Chests, and Barrels
- Composters
- Powered Rails & Hopper Minecarts
- Redstone Dust, Repeaters, & Redstone Comparators
- Observer blocks & Pistons (if hooking up pumpkin/melon modules)
- Item Frames (for organization)
4. Step 1: Laying the Foundation
Start by marking out a 7x7 circle on the ground using Stone Bricks. Place a 3-block line, go diagonal one block, place another 3-block line, and repeat until the circle connects tightly. Dig out the grass inside this ring and replace it with Spruce Planks for your interior ground floor.
Build this stone foundation up by exactly four blocks. Take your Cobblestone, Andesite, and Cracked Stone Bricks and randomly replace blocks in your foundation, concentrating heavier, darker blocks near the bottom to simulate moisture damage.
5. Step 2: Constructing the Tower Body
Place a framework of Spruce Logs going up from the four corners of your circular foundation. Bring these logs up by about 8 to 10 blocks. To create a tapering effect, bring the logs inward by one block halfway up the tower.
Fill in the walls between the Spruce Log frame using a mix of White Wool, White Concrete, and Diorite. Diorite used alongside white wool creates a fantastic “plaster and wattle” texture. Push these white wall blocks one block behind the Spruce Log frame to give the tower depth.
6. Step 3: Crafting the Rustic Roof
Create an A-frame roof using Deepslate Tiles that extends one block past the edge of the tower walls. Start with stairs on the edges, and build them up to a steep point to prevent snow buildup. Mix Deepslate Tile slabs and stairs to make the roofline look sagging and ancient. Add an overhang on the side where the sails will attach to shelter the central axle.
7. Step 4: Windmill Sails (15x15, Angled for Wind)
Find the center of the wall just beneath your roofline. Place a Stripped Spruce Log protruding outward by three blocks to act as your driveshaft.
From this central axle, build four arms using Spruce Fences extending outward by about 7 blocks in a cross shape.
Pro-tip: To make it look like the wind is actually catching the canvas, build the wool blocks one block behind the fence line. Make them 3 blocks wide at the tips and 1 block wide near the center, adding a slight diagonal twist for a dynamic sense of rotation.
8. Step 5: Detailing — Windows, Vines, Yard, Lighting
- Windows: Punch 1x2 holes in the plaster walls and use Spruce Trapdoors as shutters. Avoid glass.
- Overgrowth: Run Leaves and Vines up the side of the stone foundation.
- The Yard: Scatter Hay Bales, Barrels, and a winding Path Block trail leading to the door.
- Lighting: Hide Glowstone underneath Moss Carpets around the yard to prevent creeper spawns without spamming torches.
9. Step 6: Functional Interior (Millstone, Storage, Auto-Farm)
A giant structure is useless if the interior is just an empty wooden tube. Let’s build a highly functional interior that processes and stores your crops.
- The Ground Floor (Processing & Sorting): Build a large circular millstone in the center using Smooth Stone slabs. Surround the room with double collection chests, labeling them with Item Frames. To simulate grain processing, set up a composter-to-bone-meal loop: place a chest, a hopper below it, a Composter below the hopper, and a final hopper feeding the bone meal into an output chest.
- The Mid-Level (Auto-Harvesting): Hide your redstone behind the plaster walls. This mid-level is perfect for a micro carrot/potato farm or wheat farm. Box in a villager farmer with a patch of dirt and a composter. Underneath the farmland blocks, run a hopper minecart on powered rails. As the villager harvests crops, the hopper minecart vacuums the items through the dirt blocks before the villager can pick them all up, dropping them into a water stream collection system that flows to your ground floor.
- The Top Level (Mechanism Room): If you are running an automated sugarcane or pumpkin farm nearby, use this space to house the observer blocks, pistons, and a redstone comparator to measure chest fullness. If your redstone is complex and you spend a lot of time away from the base, you can even hide a chunk loader (using a nether portal item loop) up here in the roof so your auto-farms never stop running while you explore.
10. Java vs. Bedrock Differences
While the exterior aesthetic is identical across versions, technical players need to note a few differences for the interior:
- Redstone Quasi-Connectivity (QC): Java players can use QC for piston-based crop farms in the windmill’s roof, which won’t work on Bedrock.
- Water Mechanics: Bedrock players will find that aligning items over hoppers using water streams and sea pickles/chests can sometimes be a bit glitchier than on Java. Ensure your water stream collection shoots items directly into a hopper rather than trying to align them on the edge of a block.
- Hopper Minecarts: On Bedrock, hopper minecarts can occasionally stall on chunk borders when unloading/reloading the area. Try to build your windmill entirely within a single chunk (press F3+G on Java, or use chunk calculators on Bedrock).
11. Common Mistakes to Avoid
- Flat Sails: Making the wool perfectly flat makes the windmill look like a toy. Always curve or angle the wool behind the fence posts.
- Square Bases: Windmills require gears to turn. Square buildings don’t house circular gears well. Always use a circular, octagonal, or heavily tapered base.
- Ignoring Interior Lighting: If you leave the hollow interior dark to preserve the exterior aesthetic, creepers will spawn inside and blow up your hopper minecarts and chests. Hide sea lanterns or froglights under bottom-half slabs!
12. FAQ
How tall should a Minecraft windmill be? Aesthetically, the tower itself should be around 20 to 25 blocks tall. Once you add the sails, the total height will push 30-35 blocks. Anything shorter looks squat; anything taller starts to look like a wizard tower.
Can you make a working, spinning windmill in vanilla Minecraft? Without mods, no. Vanilla Minecraft does not support rotating structures. However, if you install the Create Mod, you can attach a Windmill Bearing to your sails to make them generate actual rotational power for your base!
Final Thoughts
Building a medieval windmill bridges the gap between form and function. It introduces vital height to your village skyline while giving you a dedicated, centralized hub for your villager farmers and crop storage.
Take your time tweaking the redstone interior, experiment with different block palettes to match your biome, and soon you’ll have an industrial masterpiece towering over your world.